How to Measure Your Meetings Using Whereby’s Webhooks
Learn how to use webhooks for Whereby Embedded to keep track of things like participant attendance and meeting length.

If you're using Whereby Embedded as a virtual classroom or telehealth platform, you might want to measure things such as student attendance or appointment length. Whereby lets you do both using webhooks. This post introduces you to webhooks in Whereby, and shows you how to use webhooks to keep track of participant attendance.
What is a webhook?
A webhook is an HTTP request that sends data from a source application to a destination URL, when an event occurs in the source application. The destination URL is known as the endpoint URL. With Whereby's webhooks, you provide an endpoint URL and indicate which event or events should trigger a request to it. You're in full control of the endpoints, which means that you can collect and process the data that Whereby sends in ways that suit your needs.
What you'll need
If you'd like to follow along with this guide, you'll need a two things:
A Whereby Embedded account with administrative privileges.
A web server and, optionally, an ngrok account
For development purposes, a local web server is the quickest way to get started. Some programming languages, such as PHP, have a built-in server that's well-suited to experimentation. That's what's used here.
Create a PHP server instance using the command below. You can replace :8000 with the port number of your choice, as long as that port isn't restricted by your operating system, or used by another application.
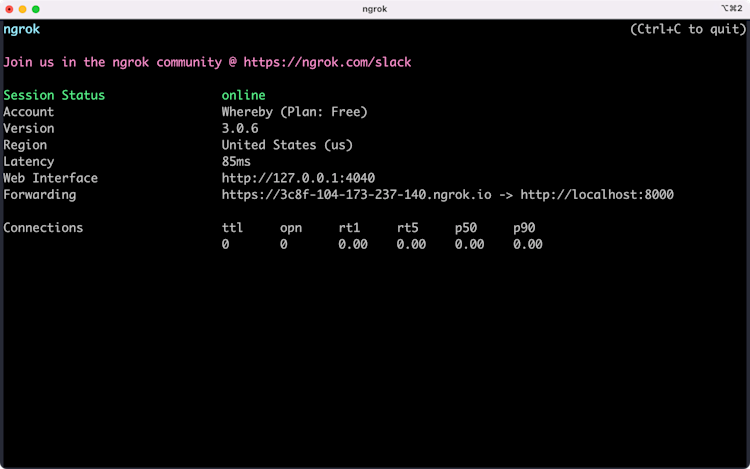
php -S localhost:8000You'll also need to make your local server available to receive external requests. ngrok is the easiest way to do this. It's a reverse proxy and tunneling service with free and paid plans. As a bonus, ngrok uses HTTPS for its URLs, which you'll need for your webhook endpoint URLs.

Setting up your local end point
When a particular event occurs, Whereby sends a POST request to the endpoint you've specified. Information about the event gets sent as a JSON-formatted string in the request body.
In the example below, our endpoint is a small PHP application that prints the JSON it's received from the webhook. Save this as incoming/index.php in your local web server's root directory. This will be your webhook endpoint.
<?php

$request_body = file_get_contents( 'php://input' );

$json = json_decode( $request_body );

print '<pre>';
print_r( $json );
print '</pre>';
You can use a separate URL for each webhook event, or one URL to track all events.
Add a webhook endpoint to your account
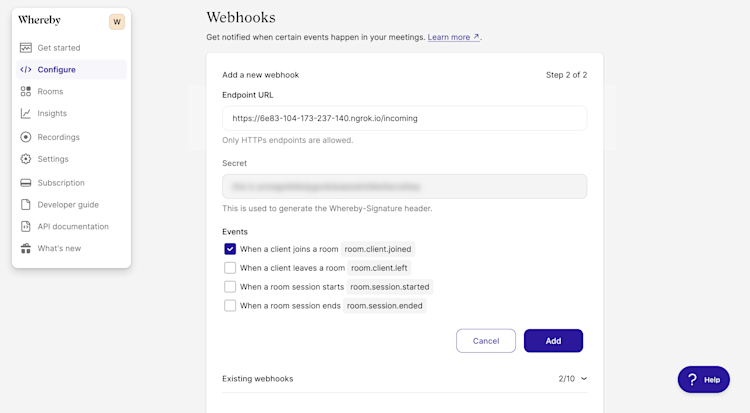
Log in to your Whereby Dashboard. You'll find the Webhooks configuration settings at the bottom of the Configure page. Enter the full URL in the Endpoint URL field (e.g. http://example.ngrok.io/incoming), and select the events for which you'd like to receive notifications.

Whereby lets you observe up to four events.
room.client.joined: Sent when a participant joins a meeting.room.client.left: Sent when a participant leaves a room, either by using theLeave Room
button or by closing the browser tab.
room.session.started: Triggered when there are two or more participants in a room.room.session.ended: Triggered when a session ends. A session ends when there are fewer than two people in a room for one minute.
Each event object contains a type property that indicates the type of event, and a data property that contains information about the room that dispatched the event. Here's an example of a room.client.joined event object.
{
    "apiVersion": "1.0",
    "id": "8d1fe2e079cd44e3c0c7292c12bbbc0d934885822701b548aedd2bbf16956aa7",
    "createdAt": "2022-08-21T21:35:35.736Z",
    "type": "room.client.joined",
    "data": {
        "roomName": "/r6y7hw",
        "meetingId": "000000001",
        "roleName": "granted_visitor",
        "numClients": 2,
        "numClientsByRoleName": {
            "owner": 1,
            "granted_visitor": 1
        },
        "metadata": null
    }
}
Every event object includes a data.roomName and data.meetingId property. The room.client.joined and room.client.left events include three additional properties:
data.roleName, which indicates the type of participant —owner,visitor,granted_visitor, andgranted_viewer— that entered or left the meeting room;data.numClients, which indicates the current number of room participants; anddata.numClientsByRoleName, which indicates the current number of participants for each role.
The room.client.joined and room.client.left event objects also include a data.metadata field. This field reflects the value of the metadata URL parameter.
Sending custom metadata to your webhook
You can use the metadata URL parameter to send additional information about the meeting room or its participants to your webhook endpoint. For example, you can include a participant identifier to track meeting attendance.
https://example.whereby.com/r6y7hw?metadata=abcdef123456When this meeting attendee joins using the URL above, the value of data.metadata will be abcdef123456, as shown in the example below.
{
    "apiVersion": "1.0",
    "id": "9c6cce3a85aed431cff9b9be861d31384b3f5e88743cf30ee4b609205e5097fc",
    "createdAt": "2022-08-21T21:38:35.736Z",
    "type": "room.client.joined",
    "data": {
        "roomName": "/r6y7hw",
        "meetingId": "000000001",
        "roleName": "granted_viewer",
        "numClients": 2,
        "numClientsByRoleName": {
            "visitor": 1,
            "granted_viewer": 1
        },
        "metadata": "abcdef123456"
    }
}
The metadata parameter value must be a string. You can use a JSON-formatted or comma-separated string as its value. Make sure that it's properly encoded for use in URLs.
Since there is a risk that a user might tamper with this value, it's a good idea to include a timestamp and signature as part of the metadata string. For example: ?metadata=abcdef123456,<timestamp>,<hashed string> You can use the timestamp and hash to validate the metadata once your application receives it.
Validating events
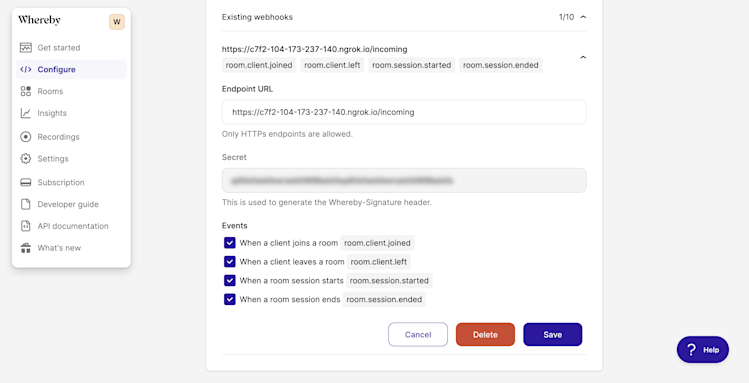
Each webhook request includes a Whereby-Signature header. Use this header to validate that the webhook request originated with Whereby and prevent man-in-the-middle attacks. To validate an event signature, you'll first need your webhook secret token. You can find it in the dashboard, under the Existing webhooks menu.

Next, you'll need to perform the following steps, as outlined in the developer documentation.
Extract the timestamp and signature from the header. Split the string on the comma, then remove the
t=andv1=from each string.Generate the signed payload by concatenating the timestamp, a
.character, and the request body.Calculate the HMAC of the signed payload, using your webhook secret as the key.
Once you've calculated the HMAC, compare its value to the signature included with the
Whereby-Signatureheader. It's the portion of the string that followsv1=. Use a timing attack safe comparison function, as shown here, instead of a standard equality operator.Guard against replay attacks by determining the difference between the current time and the header's timestamp value and comparing it to your allowed threshold (
MAX_ELAPSED_TIME).
The documentation includes an example using Node.js and JavaScript. The example below uses PHP.
<?php

# Store this in a secrets manager, not on the file system!
$webhook_secret  = 'this_is_not_a_good_secret_93823xf';

$request_headers = getallheaders();
$request_body    = file_get_contents( 'php://input' );

function is_valid_webhook_event( $body, $headers, $secret, $max_diff = 60 ) {
  $is_valid = false;

  /*
  Split the value of the Whereby-Signature header on the comma
  This will create an array in which the timestamp is the first item
  and the signature is the second.
  */
  $signature = explode( ',', $headers['Whereby-Signature'] );

  # Strip the t= and v1= from each string.
  $signature = array_map(function( $item ) {
    return preg_replace( '/^[tv][0-9]{0,1}=/', '', $item );
  }, $signature );

  /*
   Only continue if the JSON is valid.
   json_decode( $body ) will be null / falsy if it is not.

   In a production-ready application, you may want to validate the schema
   as well.
  */
  if( json_decode( $body ) ):

    /*
		 Concatenate the timestamp, a . character, and the response
     body to create a signed payload
    */
    $signed_payload = $signature[0] . '.' . $body;

    # Calculate the HMAC
    $hmac_hash = hash_hmac( 'sha256', $signed_payload, $secret );

    # Compare the HMAC and header signature.
    $hash_is_equal = hash_equals($hmac_hash, $signature[1] );

    /*
     Calculate the difference between the current time and timestamp.
     Prevents replay attacks
    */
    $time_diff = ( time() - intval( $signature[0] ) );

    $is_valid = $hash_is_equal && $time_diff < $max_diff;

  endif;

  return $is_valid;
}

if( is_valid_webhook_event( $request_body, $request_headers, $webhook_secret ) ):
  // Parse and process the incoming JSON.
endif;
You should validate incoming events before doing anything with the event data. Be sure to validate, filter, or escape its schema and values as appropriate for your application, too.
Webhooks can help you build more robust applications using Whereby Embedded. They're a great way to measure how employees and customers are using your organization's rooms.


